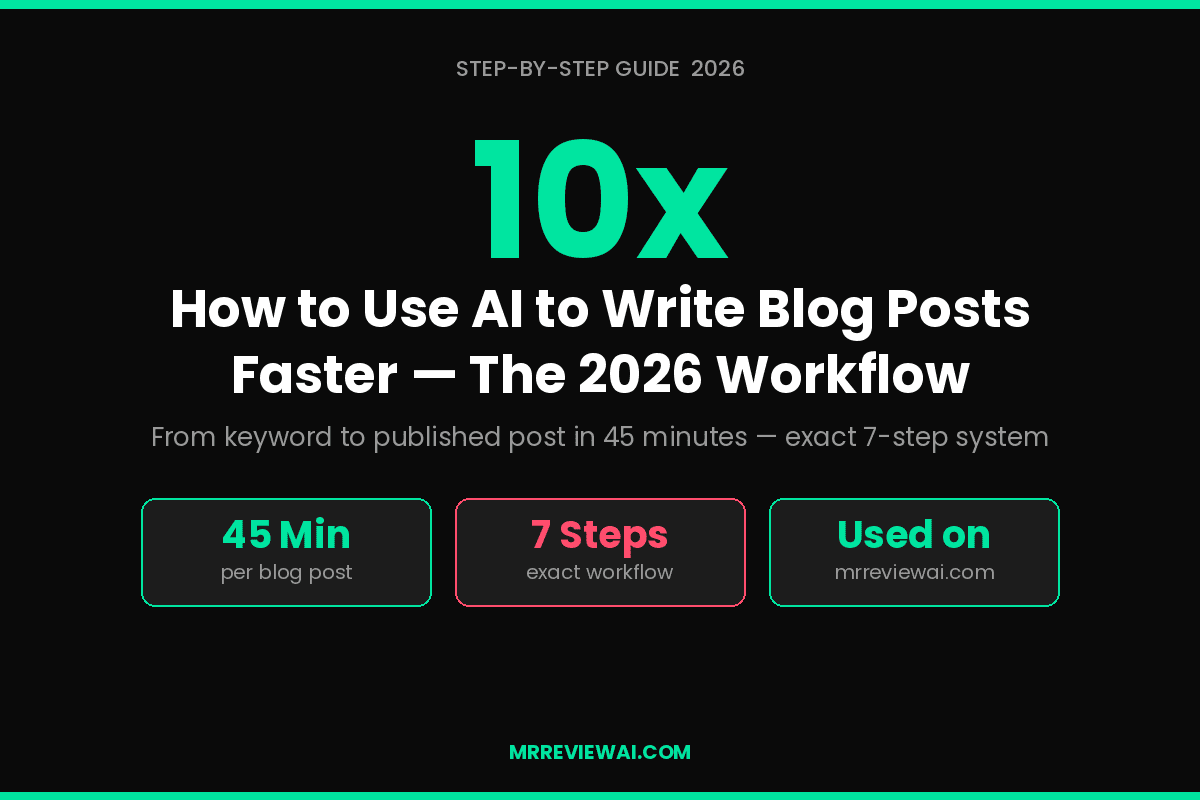
How to Use AI to Write Blog Posts 10x Faster (2026 Guide)
This post contains affiliate links. we may earn a commission at no extra cost to you.
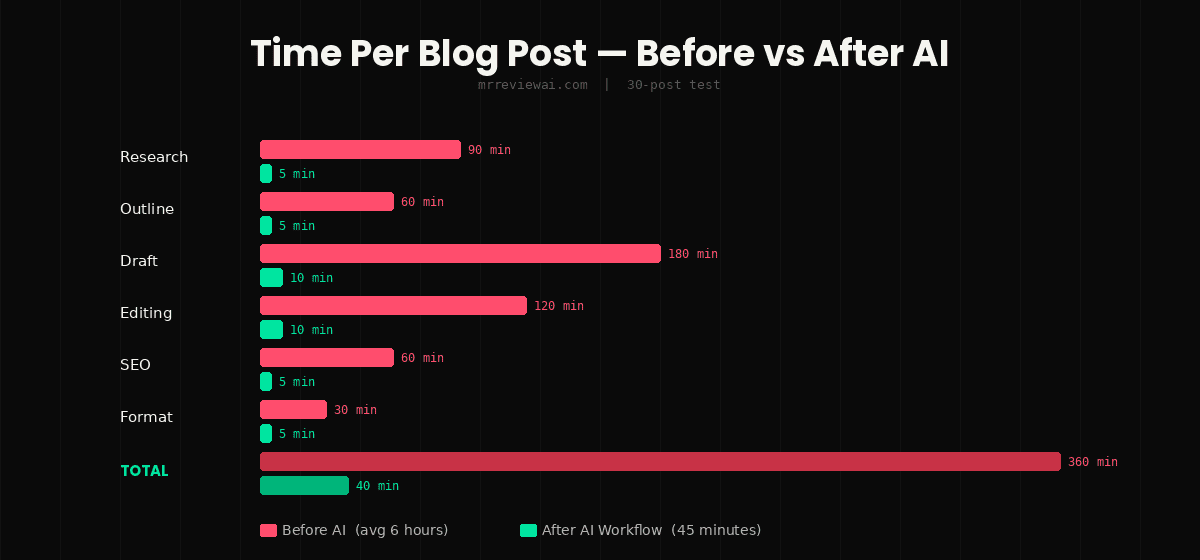
Want to know how to use AI to write blog posts faster? I used to spend 4–6 hours writing a single blog post.
Research, outline, first draft, editing, formatting, SEO optimization — by the time I hit publish, half the day was gone. And the post was barely 1,200 words.
Now, knowing how to use AI to write blog posts faster, I publish a complete, SEO-optimized post in under 45 minutes. Same quality. Significantly less time.
The secret to knowing how to use AI to write blog posts faster is having a system — not just an AI tool. Because most people who try AI writing end up with mediocre output they still have to rewrite from scratch. That’s not 10x faster. That’s just a different kind of slow.
In this guide on how to use AI to write blog posts faster, I’ll show you the exact workflow I use on mrreviewai.com. Step by step, tool by tool, in the right order.
Table of Contents
- What You Need Before You Start
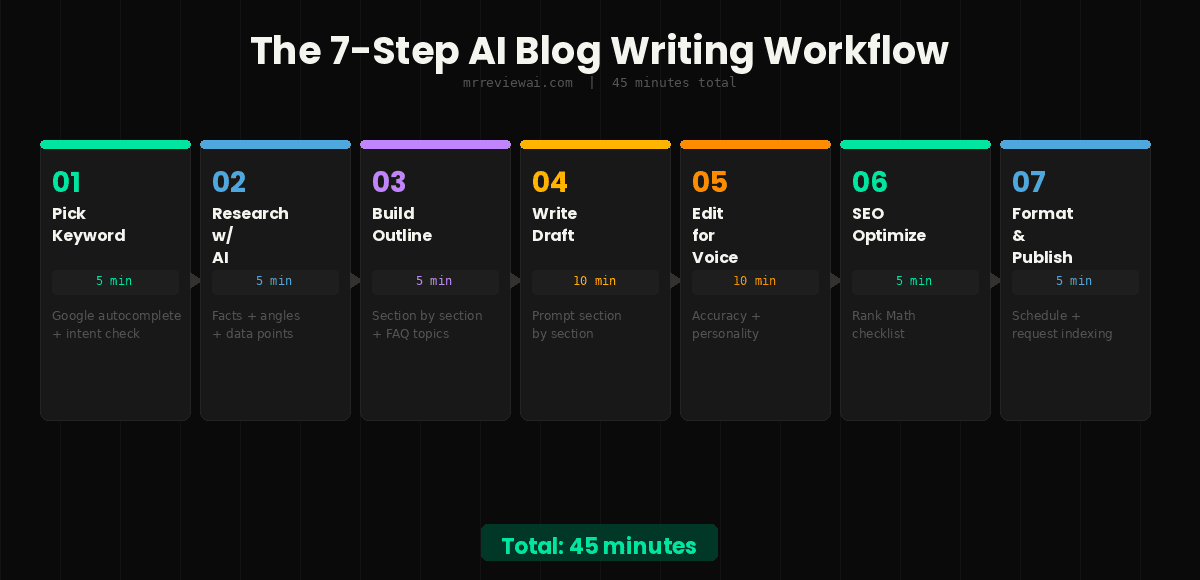
- Step 1: Pick the Right Keyword (5 minutes)
- Step 2: Research with AI (5 minutes)
- Step 3: Build Your Outline (5 minutes)
- Step 4: Write the Draft with AI (10 minutes)
- Step 5: Edit for Voice and Accuracy (10 minutes)
- Step 6: SEO Optimize (5 minutes)
- Step 7: Format and Publish (5 minutes)
- Expected Results
- Common Mistakes to Avoid
- FAQ
How to Use AI to Write Blog Posts Faster: What You Need {#what-you-need}
Before jumping into the workflow, you need 3 things in place:
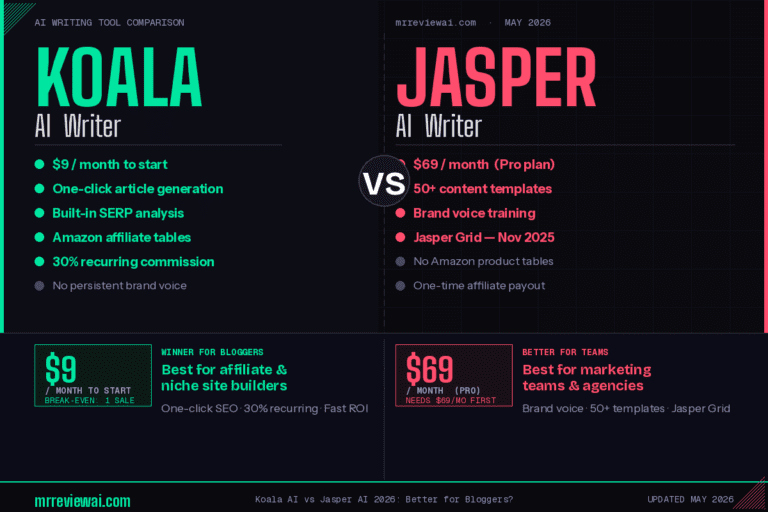
1. An AI writing tool For long-form blog posts, I use Writesonic — it’s the best value at $16/month and has real-time web data so your facts stay current. If budget isn’t a concern, Jasper AI produces slightly better output with brand voice training.
If you’re just starting and want free, Writesonic‘s free plan gives 10,000 words/month — enough for 5-6 complete posts.
2. A keyword to target Don’t write without a target keyword. Even a quick Google search to confirm people are searching for your topic saves hours of wasted effort later.
3. A publishing platform This guide assumes WordPress, but the workflow applies to any CMS.
That’s it. Let’s build the post.
Step 1: Pick the Right Keyword (5 minutes) {#step-1}
Why this step matters: Writing without a keyword is like driving without a destination. You’ll produce content nobody searches for.
What to do:
Go to Google and type your topic. Look at the autocomplete suggestions — those are real searches people are making right now.
For example: typing “how to use AI to write” shows suggestions like “how to use AI to write blog posts”, “how to use AI to write emails”, “how to use AI to write blog posts faster” (our focus keyword for this guide). Each of those is a viable keyword.
The filter I use:
- Does the keyword have clear search intent? (People want to learn something specific)
- Are the top results from massive sites like HubSpot, Forbes, or Wikipedia? (If yes, it’s too competitive for a new blog)
- Is the keyword specific enough that I can answer it fully in 1,500 words?
Target sweet spot for new blogs: keywords with 500–3,000 monthly searches, where the top results are from mid-sized blogs rather than media giants.
Pro tip: Add the current year to your keyword — “how to use AI to write blog posts 2026” — it signals freshness and is easier to rank for than the evergreen version.
Step 2: Research with AI (5 minutes) {#step-2}
Why this step matters: Most AI tools hallucinate when asked to write directly. They make up statistics, invent quotes, and produce generic content. The fix is to research first, then write.
What to do:
Open your AI tool and run this prompt:
“I’m writing a blog post about [your keyword]. Give me: 1. The 5 most important things readers need to know about this topic 2. The most common mistakes people make 3. 3 specific examples or data points I can reference 4. The main question someone searching this keyword wants answered”
Read through the output. Don’t just copy it — identify what’s accurate, what needs fact-checking, and what angles are missing.
If you’re using Writesonic, the real-time web data feature pulls current information automatically. Cross-check any statistics against original sources before using them.
Time check: 5 minutes is enough to collect the core knowledge. You’re not writing a dissertation — you’re writing a helpful blog post.
Step 3: Build Your Outline (5 minutes) {#step-3}
Why this step matters: An outline is what separates a coherent post from a rambling one. AI writes much better when it knows the structure upfront.
What to do:
Prompt your AI tool:
“Create a detailed outline for a 1,800-word blog post titled ‘[your title]’. Include: – An introduction that opens with a specific problem or result – 6–8 H2 sections with H3 subpoints where relevant – A FAQ section with 4 questions people actually search – A conclusion with clear next steps The reader is a [describe your audience]. Tone: direct and practical, no fluff.”
Review the outline. Add or remove sections based on what you actually know about the topic. Move things around if the flow doesn’t make sense.
This step is non-negotiable. Skipping the outline and asking AI to “just write the post” produces the worst output. The outline is where you maintain editorial control.
Step 4: Write the Draft with AI (10 minutes) {#step-4}
Why this step matters: This is where you save the most time — but only if you’ve done steps 1–3 first.
What to do:
Feed the AI your outline section by section, not all at once. Writing section by section:
- Keeps the output focused
- Maintains context between sections
- Lets you catch problems early
Prompt template for each section:
“Write the ‘[section title]’ section for my blog post about [keyword]. This section should: – Be approximately [X] words – Open with [specific angle or hook] – Include [specific point from your research] – Match this tone: [paste a sentence from your own writing or describe it] – End with a natural transition to the next section about [next section topic]”
Write the introduction last — it’s easier to write a great opener when you know exactly what the post covers.
Realistic expectation: The AI draft will be 70–80% there. It will occasionally go generic. It will sometimes misuse data. That’s fine — fixing 20% is still dramatically faster than writing 100% from scratch. That’s the whole point of learning how to use AI to write blog posts faster — you produce more, with less effort.
Step 5: Edit for Voice and Accuracy (10 minutes) {#step-5}
Why this step matters: This is what separates content that builds trust from content that gets ignored. AI output sounds like AI output until a human touches it.
What to edit:
Accuracy first — check every specific claim, statistic, or product detail. AI confidently states wrong things. A single inaccurate price or feature description can destroy reader trust.
Voice second — read each paragraph aloud. If it sounds like a press release, rewrite it. Add:
- Your actual opinion (“I found this works better when…”)
- Specific examples from your experience
- Moments of honest uncertainty (“I’m not sure this matters for smaller blogs”)
- Short punchy sentences between longer ones
Generic phrases to delete:
- “In today’s digital landscape…”
- “It’s important to note that…”
- “This comprehensive guide will show you…”
- “Without further ado…”
Time check: 10 minutes of focused editing transforms a competent AI draft into something that actually sounds like you. Don’t skip this.
Step 6: SEO Optimize (5 minutes) {#step-6}
Why this step matters: A great post that nobody finds is a wasted post. SEO optimization takes 5 minutes if you do it systematically.
Checklist — do these in order:
☐ Primary keyword in H1 — exact or close match ☐ Keyword in first 100 words — naturally, not forced ☐ Keyword in at least one H2 — use a variation if exact match sounds awkward ☐ Meta description — 150–160 characters, includes keyword, ends with a hook ☐ URL slug — short, keyword-rich, no stop words ☐ Internal links — link to 2–3 related posts on your site ☐ Image alt text — hero image alt text includes primary keyword ☐ FAQ section — answers the exact phrasing of People Also Ask questions
In WordPress with Rank Math, the SEO panel on the right shows your score as you work through this list. Aim for 80+ before publishing.
Step 7: Format and Publish (5 minutes) {#step-7}
Why this step matters: How a post looks affects how long readers stay. Long unbroken paragraphs lose readers before they get to your affiliate links. This is why formatting is the final step when you use AI to write blog posts faster — the AI writes efficiently, but you polish it for human readability.
Formatting rules:
- Maximum 3–4 lines per paragraph — break longer paragraphs in two
- Bold the key insight in every section — readers skim before they read
- Use H2 and H3 consistently — Google reads your headings as a content map
- Add a table where you’re comparing options — tables are the most-shared formatting element in review content
- One CTA per post — don’t scatter affiliate links randomly; put the primary CTA after your clearest recommendation
Scheduling in WordPress:
In the post editor, instead of clicking “Publish”, click the date next to “Publish immediately” → set your preferred date and time → click “Schedule”.
Best time to publish for US audience: 7–9 AM EST on Tuesday, Wednesday, or Thursday. This is when Google’s crawlers are most active for new content and when US readers are most likely to engage.
Tip for Google: After scheduling, go to Google Search Console → URL Inspection → paste your new post URL → click “Request Indexing”. Google will crawl it within 24–48 hours instead of waiting weeks.
Expected Results {#results}
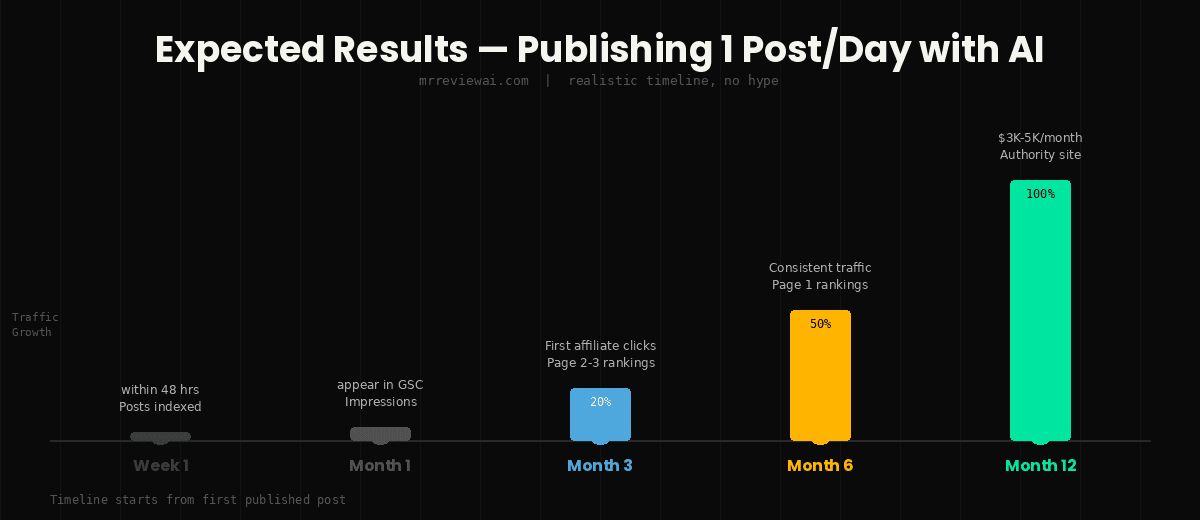
Here’s what realistic expectations look like using this workflow:
Week 1: Posts are indexed within 24–48 hours. No traffic yet — Google needs time to evaluate new content.
Month 1: A few posts start getting impressions in Google Search Console. No significant traffic yet. This is normal — don’t panic.
Month 3: Posts targeting low-competition keywords start ranking on page 2–3. Traffic trickles in. First affiliate clicks appear.
Month 6: Well-optimized posts ranking page 1 for their keywords. Consistent daily traffic. First commissions.
The workflow doesn’t change any of this timeline. What it does is let you publish 5–7x more content in the same time — which means more chances to rank, more internal links, more topical Once you know how to use AI to write blog posts faster, you compound your SEO advantage every week.authority.
Common Mistakes to Avoid {#mistakes}
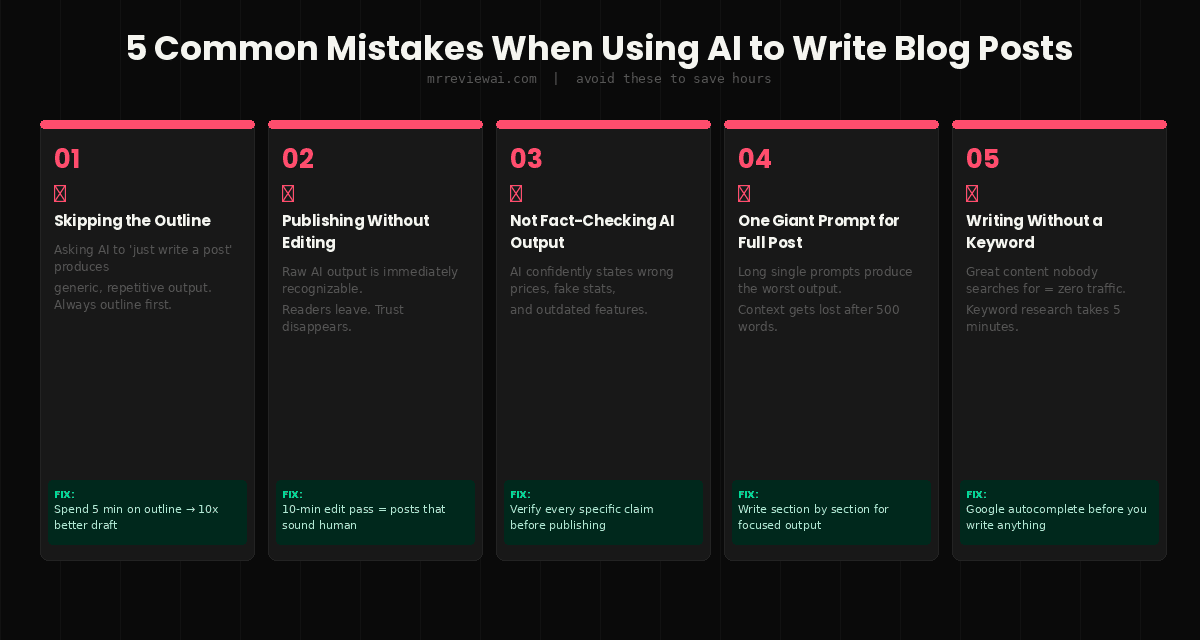
Mistake 1: Skipping the outline Asking AI to “just write a 1,500-word post about X” produces the worst output. Always outline first.
Mistake 2: Publishing without editing AI output published without human editing is immediately recognizable — and readers leave. The 10-minute edit step is non-negotiable.
Mistake 3: Using AI for facts without checking AI confidently states wrong information. Always verify pricing, statistics, and product features against official sources before publishing.
Mistake 4: Writing every section at once One long prompt for a full post produces generic, People trying to use AI to write blog posts faster with one massive prompt always end up rewriting everything.repetitive output. Write section by section for much better results.
Mistake 5: Optimizing for the wrong keyword Check that people actually search for your keyword before writing. 10 minutes of keyword validation saves hours of wasted effort.
Bonus Step: Turn Your Blog Post Into Audio with ElevenLabs (5 Minutes) {#bonus-audio}
Once your post is published, there’s one more thing worth doing: convert it to audio. A growing percentage of content consumers prefer listening to reading — and audio versions give your blog post a second life as a podcast episode or YouTube voiceover.
ElevenLabs generates ultra-realistic AI voiceovers from text. Paste your article, pick a voice, and export an MP3 in under 5 minutes. The audio quality is indistinguishable from a professional voice actor — readers have no idea it’s AI-generated.
If your audience prefers a more conventional broadcast voice — closer to corporate narration than expressive storytelling — I’ve also been running Murf on the same scripts as a comparison. Different feel, faster cleanup workflow, similar 5-minute export.
How to use it with your blog content:
- Copy your finished post text
- Paste into ElevenLabs and select a voice that matches your brand tone
- Export as MP3 and embed it at the top of your blog post
- Upload the audio to a podcast platform (Spotify, Apple Podcasts) for additional discovery
Posts with embedded audio have longer average time-on-page — a positive signal for SEO. It’s one of the fastest ways to get more value from content you’ve already written.
FAQ {#faq}
How long does it take when you use AI to write blog posts faster? Using the workflow in this guide: 40–50 minutes for a complete 1,800-word post. That includes research, outline, draft, editing, SEO optimization, and publishing. Without a structured workflow, most people spend 2–3 hours even with AI assistance. Knowing how to use AI to write blog posts faster with the right system is the difference between 1 post and 5 posts per week.
Does Google penalize AI-written content? Google’s official position is that it doesn’t penalize AI content — it penalizes low-quality content. Well-edited, accurate, genuinely helpful content ranks regardless of how it was created. The editing step in this workflow is what keeps your content out of Google’s “thin content” category.
Which AI tool is best when you want to use AI to write blog posts faster? For most bloggers, Writesonic at $16/month is the best value — real-time web data, good long-form output, and a free plan to start. For brand-consistent content at scale, Jasper AI at $39/month produces better output with brand voice training. See our full comparison of AI writing tools for more detail.
Can I use ChatGPT instead of a dedicated AI writing tool? Yes. ChatGPT Plus ($20/month) can follow the same workflow. The main limitation is that it doesn’t have real-time web data in the base version, which means you need to fact-check more carefully. Dedicated writing tools like Writesonic include SEO features and web research that ChatGPT doesn’t.
How many blog posts can I write per day with this workflow? Realistically, 2–3 high-quality posts per day without burning out. Most consistent bloggers publish 1 post per day — which with this workflow takes under an hour, leaving the rest of the day for other work. This is the real benefit of learning how to use AI to write blog posts faster: sustainable, high-volume publishing without burnout.
If you’ve been spending full days on single posts, now you know how to use AI to write blog posts faster — and this workflow will change how you think about content production. The Every blogger who masters how to use AI to write blog posts faster gains a significant publishing and SEO edge over competitors who still write manually.bottleneck isn’t writing speed anymore — it’s having a system and sticking to it.
Start with one post using this workflow. Time yourself. See what 45 minutes actually produces.
👉 [Try Writesonic Free — 10,000 words/month, no credit card required →] Writesonic
Published by mrreviewai.com | Last updated: April 2026 Workflow tested on 30+ blog posts across multiple niches.
Frequently Asked Questions About Writing Blog Posts with AI
How much of a blog post should be AI-generated versus written by a human?
I use AI for structure, first drafts, and expanding bullet points. Then I rewrite heavily. My rule: if I cannot add a personal experience, a real number, or an honest opinion to a section, I either research it better or cut it. AI gives me speed. I give the content credibility.
Can Google tell if a blog post was written by AI?
Google can detect some AI patterns, but the more important factor is whether the content is genuinely helpful and original. I have published AI-assisted posts that rank well and hand-written posts that did not. The quality of the content matters more than who or what produced the first draft.
What is the realistic time saving from using AI for blogging?
I went from about 7 hours per 2,000-word post down to about 2 hours, including research, AI draft generation, editing, and SEO optimization. That is not a magic number, but it represents what a real workflow looks like after getting past the learning curve.
Which AI writing tool is best for affiliate review posts specifically?
Jasper AI gives me the most control over review-style content. Koala AI is faster for producing a first draft that requires minimal editing. I use Koala for initial drafts and Claude AI for fact-checking and rewriting specific sections that need more precision or personal voice.
What should I always do before publishing AI-written content?
Three things: fact-check every specific claim the AI makes because it hallucinates numbers and dates, add at least one section from your own real experience, and run it through Rank Math to confirm the on-page SEO is solid. Those three steps separate publishable content from generic AI output.
FREE WEEKLY BRIEFING
Get AI tool insights before everyone else
One real story. One tested tool. One takeaway. Every week. No spam, no sponsored picks.
No thanks, I already know enough

About the Author
Mr Review AI Nguyen
This review was researched and tested hands-on by the Mr Review AI editorial team. We create real accounts, run actual campaigns, and document every limitation we encounter — no vendor demos, no copied spec sheets. For each review, we record setup time, what broke, and what surprised us. We have been actively testing email marketing and SaaS tools for mrreviewai.com since the platform launched (June 2026). Our reviews are editorially independent: no tool pays for a score or placement, ever. Where we have affiliate relationships, we disclose them transparently on each page.